DropIn Slideshow - Put your images in a slideshow, immediately!

Description
If you have some images that you’d like to see more often, you need the DropIn Slideshow ™ app.
Note: DropIn Slideshow just got better! You can check out the release notes for version 3
here.
With DropIn Slideshow, you can quickly create a slideshow – just add images using drag and drop. Once you have added two or more images, the show begins! You can view the slideshow in its own window while you run other apps, or see the show in full screen mode.
|
|
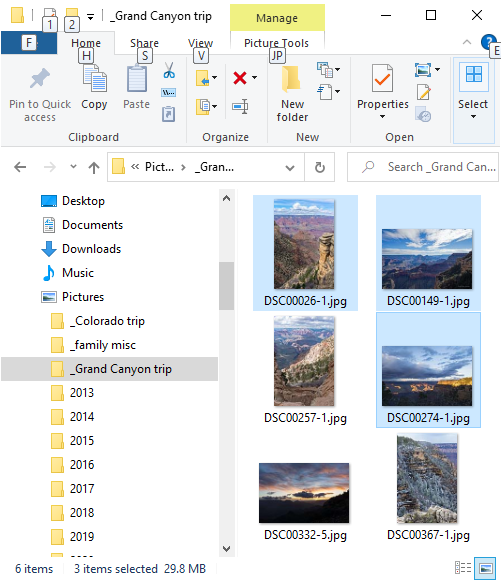
1 - Select the images |
|
|
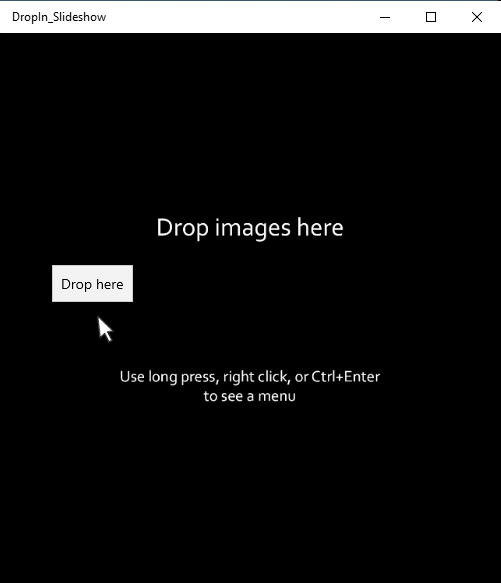
2 - Drop them into DropIn Slideshow |
|
|
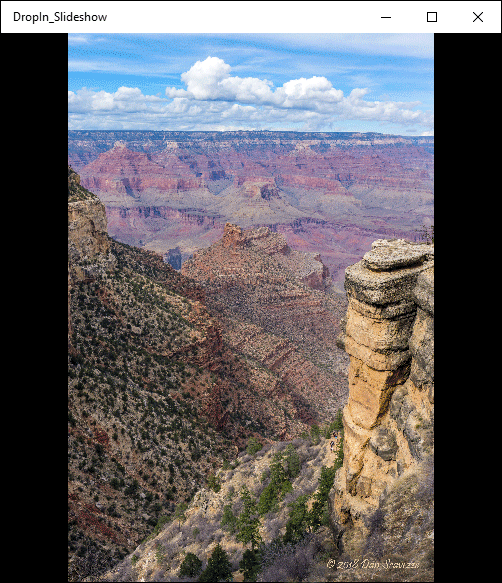
3 - Boom! You've got a slideshow |
In the DropIn Slideshow edit window, you add slides, remove slides, and rearrange slides. You can also add transition effects or sound effects to the slides. When you're happy with your slideshow, save your show script to a "script" file. The next time you want to see the show, double click the script file. You can also record your slideshow to a video file in .mp4 format so you can easily share it with friends.
To start creating slides, just drop a single image file, multiple files, or a folder containing images on to the Main window. Remember, once you have created two or more slides, the show begins!
Getting Started
When you drop an image file into DropIn Slideshow, the app will add properties to the image to make it into a "slide." The properties exist only in the context of the slideshow. Your original image file is NOT modified.
For example, each slide has a duration and a transition property in the context of the show. The duration is the total amount of time the image will be shown on the screen. The transition is the effect that will be applied to bring the next image on the screen. For example, a Dissolve transition will make the image currently on the screen fade out as the next image fades in. A Zoom In transition will zoom into the current image (make the current image bigger) before the next images appears. A slide’s transition can also be "None." The length of time that it takes for the transition to occur is the "transition duration."
Note that when an image file is dropped in, DropIn Slideshow will use default values to create the slide. You can change the default values that are used in the Settings window. The Settings window is described later in this document.
Once a slide is in the show, you can change the (total) duration, the transition, and the transition duration of a slide in the Edit page. You also change other properties of slide in the Edit page.
For some examples, check out the video.
Using the Edit Page
When you first launch the DropIn Slideshow app, you see its Main window / Main page. At any time while viewing the Main page, you can see a menu of commands by taking one of three actions – press and hold a touch screen for a few seconds, click the right button on your mouse, or simultaneously press the Ctrl key and the Shift key on your keyboard. Once the menu appears, click the pencil icon on the menu to view the Edit page. Think of the Edit page as overlaying the Main page.

There are four main areas in the Edit page. At the top of the page (perhaps below an advertisement) all the "Slides" are displayed in a time line. You may need to scroll the time line horizontally to see all your slides.
Below the slides is the second major area – a horizontal line of "Candidates." You will probably need to select the Candidates folder to make the Candidate images appear. (See the discussion of the "Choose folder" button below). The candidates may already be in the slideshow, or they may not. To add a candidate to the slideshow, just drag it from the Candidates area and drop it on one of the slides in the slideshow time line. The candidate will be added to the slides show after the slide where it was dropped. You can also use buttons to Send a selected candidate, or all the candidates, to slide show
Below the slides, and just to the left of the Candidates area, is the "Rejects" area. To remove a slide from the slideshow, drag it to the rejects area and drop it there.
The fourth area of the Edit page contains buttons that can be clicked to take actions on the slideshow and on the candidates.
The Duration, Transition, and Sound link/buttons let you change the Duration, Transition, and Sound associated with the selected slide, or all slides.
The Candidates “Choose folder” button lets you manually specify the folder to be used as a source of candidates.
The Save As, Save, and Open buttons let you save and retrieve your work as a DropIn Slideshow file (a file that has a .dsi extension). It's considered "best practice" to store your .dsi file, with your slideshow images, in a folder under the Pictures folder.
The Settings Page
The Settings page lets you customize DropIn Slideshow to meet your needs. For example, you can set the default values used for duration, transition, and transition duration. These values are used when an image file is dropped in to create a slide. You might find that you normally prefer certain settings, say a 5 second duration and no transition, but that for a particular slide show maybe you want to slow things down. Maybe you want a 9 second duration, with a dissolve transition for 2 seconds. Rather than dropping the slides and then editing the duration on every slide, you might want to change those default values in the Settings page.
The Settings page also lets you enable/disable audio, make the window title bar "invisible" and keep your screen on for long running slideshows (when the operating system’s power save feature might have turned the screen off).
DropIn Slideshow - Helpful Hints
How can I see the slideshow in full screen mode?
Bring up the DropIn Slideshow menu then click the Fullscreen icon to toggle to/from full screen mode. (To bring up the menu, press and hold a touch screen for a few seconds, click the right button on your mouse, or simultaneously press the Ctrl key and the Shift key on your keyboard.) When you are in full screen mode, you can also press the Escape key to leave full screen mode.
I don't see any candidates in the Edit page
In previous versions of the app, DropIn Slideshow would automatically specify a Candidates folder and load the candidates, based on the last file you dropped. For performance reasons, the latest version does not do that. You must select a folder as a source of Candidates, by using the Edit page "Choose folder" button, to display the Candidates.
Making a Recording
When you start to record a slideshow it takes a while for the recorder to start up, and to shut off. You'll probably need to add some time to your first slide, or maybe add another slide before your first slide, to compensate for the recorder's startup delay. And, you may get some extra time recorded your last slide before the recorder shuts off. The amount of time you have to add, or subtract, depends on the speed of your machine, so you'll have to experiment.
Recording files can be big. You can reduce the size of the file you create by changing the size of the window that you record. Note that the aspect ratio of the window will also be reflected in the recording.
Privacy Policy
DropIn Slideshow does not collect personally identifiable information.
The Privacy Policy is found here.